Top tips for furniture layouts.
A floor plan lays the foundation for every decision that follows. Here’s why:

Traffic flow: A floor plan shows how rooms connect and how people will move through the space. Without it, you might have beautiful ideas that don’t actually function well in real life. Creating a scale floor plan ensures practical flow and usability.
Considering scale and proportion: Furniture, joinery, and decor all look different depending on the size of a room. A floor plan lets you test proportions on paper (or digitally) before you buy or build, avoiding costly mistakes.
Maximising Potential: By analysing your room, you can identify opportunities, like unused nooks, awkward corners, or empty vertical space, that can be transformed into storage or feature areas. You can also plan to maximise natural light, create interesting sightlines, and focal points.
Clarifying the Budget: A floor plan acts as a map for costs, allowing you to identify areas where joinery, walls, or utilities need adjustments and preventing rework down the track. It’s far cheaper to erase a line than to move a wall later.
Communication: Builders and trades all understand a floor plan. It provides a shared reference point so everyone is on the same page.
In short: a floor plan isn’t just the first step, it’s the anchor of good design, helping ensure the end result is both beautiful and practical.
Here’s a simple step-by-step way to start a design with a floor plan
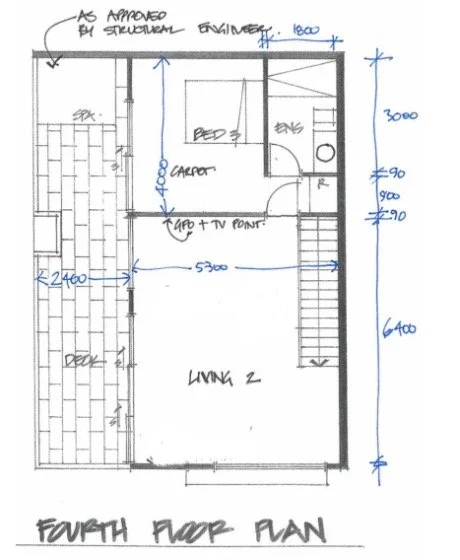
1. Measure the Space
Grab a tape measure (or laser measure if you want to be precise).
Record the length and width of each wall, window, door, and any fixed features (fireplaces, built-ins, power points).
Don’t forget ceiling heights, important for lighting, cabinetry, and scale.
2. Sketch or Use Software
The old-school way: draw it by hand on graph paper, using each square as a unit (e.g., 10cm).
The digital way: use free tools like RoomSketcher or Floorplanner for more accuracy and 3D visuals.
Interior designers (like Hue and Space ) use professional CAD programs, but starting with graph paper is just fine.
3. Mark Openings and Flow
Add door swings. Both the size and direction (including cabinets and wardrobes), as well as window placements, and how traffic moves through the room.
This shows you where furniture can’t go, which is just as important as where it can.
4. Layer in Function
Ask: What’s the primary purpose of this room? (e.g., relaxation, entertaining, storage).
Use the plan to check if the layout matches the function.
5. Test Furniture Placement
Cut out scaled shapes of sofas, beds, tables, etc (or use digital drag-and-drop).
Move them around until the proportions feel right, allowing at least 70–90cm for walkways.
Think of it like baking: the floor plan is your recipe. Without it, you’re just throwing ingredients into the bowl and hoping it turns into cake.
Now, choose the first thing you want to see.
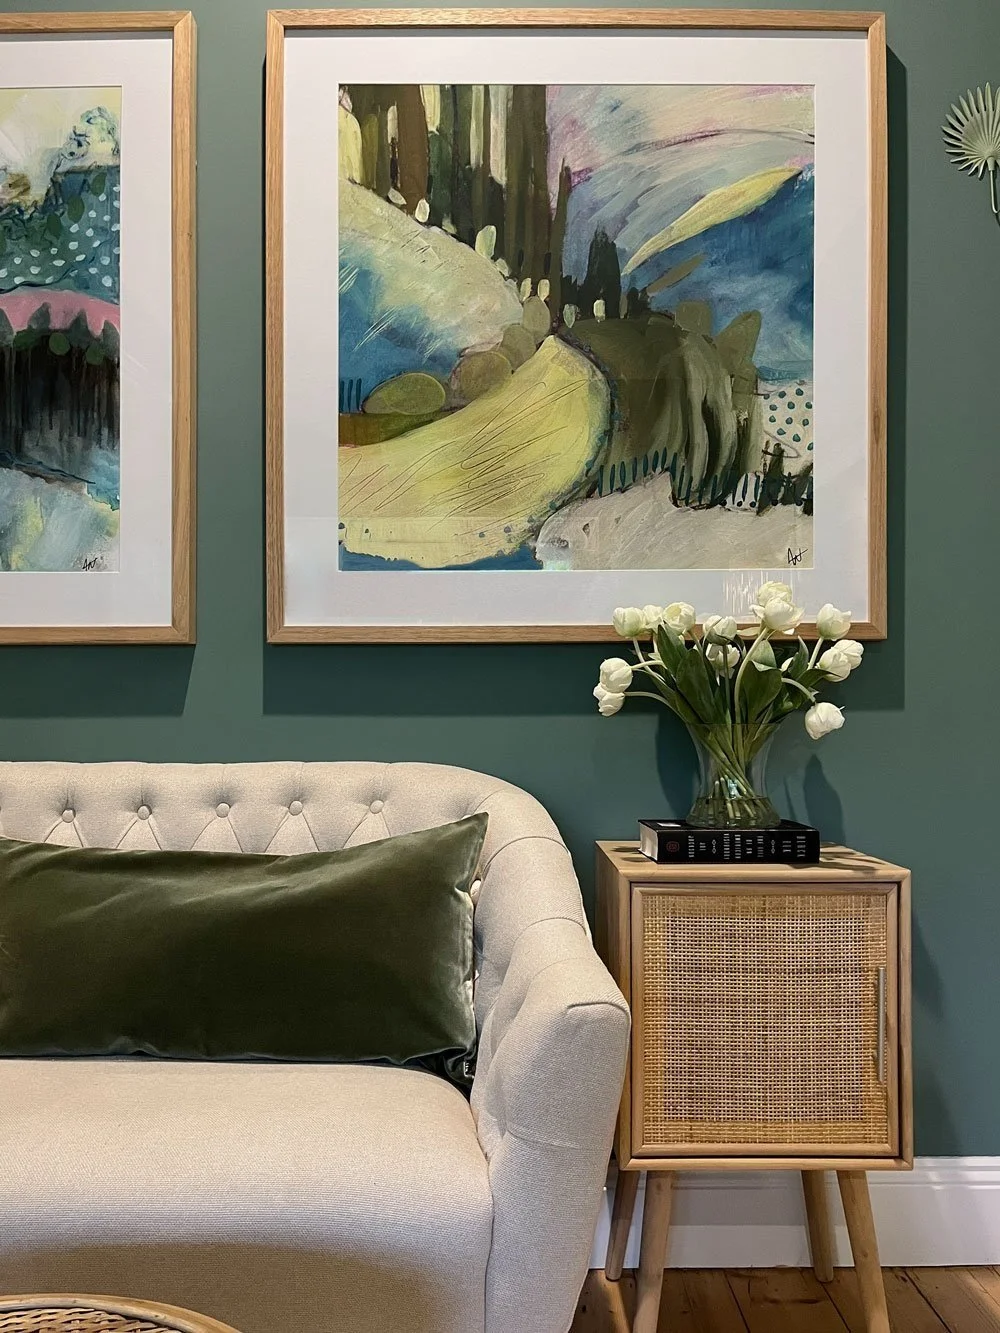
In designer speak, you’re choosing a focal point. A design element or feature in a room that draws the eye and creates a sense of visual interest. It’s going to be the centre of attention and the one element that stands out the most in your space. A well-designed focal point helps to enhance the overall look and feel of a room.
Your room’s focal point can take many different forms. It could be a piece of artwork, a fireplace, a large window with a beautiful view, a unique piece of furniture, a decorative pendant light or an architectural detail. It’s up to you to decide which feature you’d like to stand out to create a sense of visual interest in your room.
If there’s no easy target, you can create your own focal point and use design elements like colour, texture, lighting, and furniture arrangement to support your choice. By highlighting a particular element in a room and drawing the eye towards it, you can create a sense of balance and harmony in the space.
5 ways designers create a focal point to add visual interest in a space:
Make it unique: Include an oversized piece of artwork or a bold piece of furniture to create a standout feature.
Arrange furniture: Place your sofa, chairs and side tables around the feature in a way that draws attention.
Use colour: Choose colours that contrast with the walls and furnishings to make your feature stand out.
Add texture: Enhance the feature by incorporating a decorative rug or textured wallpaper nearby.
Highlight with lighting: Use lighting to draw attention to the feature, like a spotlight or accent lighting.
“Remember, the focal point should be the centre of attention in the room, but it should also work in harmony with the rest of the design elements. ”
Once you’ve determined your focal point, arranging the rest of the space gets easier.
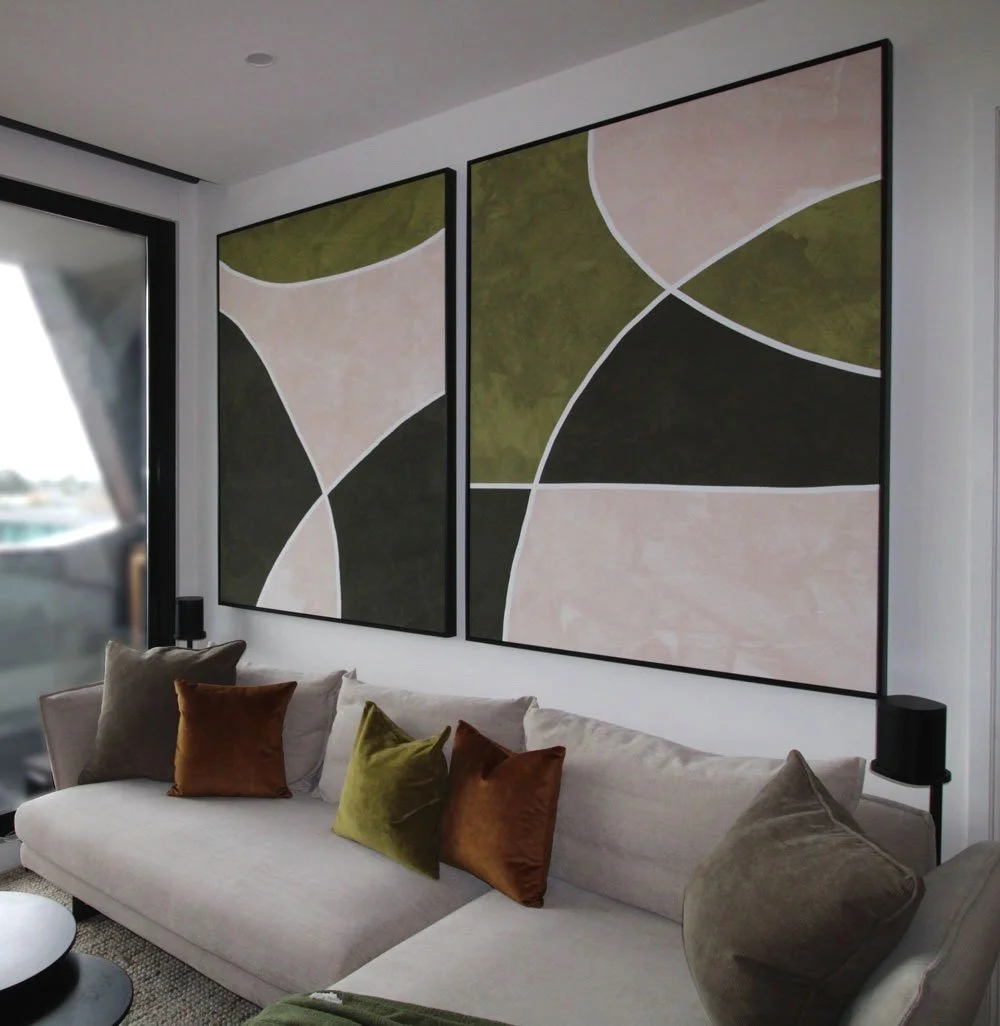
Placing large art above an over-sized sofa make sit appear smaller.
Conversation areas: Arrange seating in groups to create comfortable conversation areas. Face chairs and sofas towards each other to encourage your guests to interact.
Balance: Distribute furniture evenly throughout the space to create a balanced look. Use a mix of large and small pieces to create visual interest. Don’t place all of the large, heavy pieces or strong colours on one side, or you risk “tipping” the room, which means your design is unbalanced.
Define spaces and zones: Use rugs, lighting or paint to define different areas in the room. This can help create a cosy and intimate feeling in larger rooms.
Experiment: Don't be afraid to experiment with different furniture layouts until you find the one that works best for your space and lifestyle.
Make sure that the size of the furniture is proportional to the size of the room. You can play with scale to make items appear larger or smaller. For example, to make something appear smaller, place something oversized next to it.
The best furniture layout depends on your personal preferences, how you live, and the size and shape of your room. With these tips, you should be able to create a furniture layout that is both functional and visually pleasing.
Here’s a breakdown of the most practical (and designer-approved) ways to place furniture in key spaces:
In your living room
Anchor with the most significant piece (usually the sofa), placed facing the focal point (fireplace, view, feature wall).
Balance your sofa with chairs or an ottoman. Arrange them to form a “U” or “L” shape around the sofa for conversation.
Use our coffee table rule. Keep it about 40–50cm from the seating for legroom but within reach.
Don’t always push sofas to the wall; pulling it forward with a console behind often improves flow.
In your dining room
Centre the table under a light fixture (or where one can be added).
Leave clearance of at least 90cm between table edges and walls/joinery so chairs slide out comfortably.
Choose a shape to fit the space. Round tables work well in tight or square rooms, while rectangular ones suit long spaces.
Add a sideboard or bar cart along a wall within reach for storage and serving.
In your bedroom
Locate your bed first. Centre it on the main wall so it feels welcoming.
Use symmetry to create a sense of calm. Place bedside tables and lamps (with warm coloured globes) on both sides if possible.
Clear circulation. Leave at least 60cm around the bed for walking.
Don’t forget to add secondary furniture. A bench at the foot of the bed or an armchair in a corner adds function without clutter.
Place a desk or vanity under a window to utilise natural light, not crammed into the flow zone.
Home Office
Desk placement is ideally facing a window (natural light) or a solid wall (no distractions). Avoid having your back to the door.
Storage shelves or cabinets on side walls keep essentials accessible.
Include an occasional chair if space allows. It’s essential to have a secondary comfortable place to sit.
Place outlets near your desk to avoid running cords across the floor.
Multi-Purpose or Open Plan Spaces
Define zones with rugs by placing one under the lounge setting and another under the dining table.
Visually separate the lounge from the dining area by using the back of the sofa as a divider.
Use a consistent palette of colours and materials to keep your room harmonious, even when you get the inspiration to move the furniture around.
Traps to Avoid
Don’t push every piece against the walls; it makes the room feel flat and awkward.
Don’t ignore scale. Tiny furniture in a big room (or oversized in a small room) throws everything off.
Don’t block natural light sources like windows or glass doors.
Don’t forget walkways; leave at least 70–90cm for comfortable movement.
Don’t make all the seating face the TV, it kills conversation flow.
Don’t use a rug that’s too small; it should anchor the seating area, not “float” under the coffee table alone.
At the end of the day, furniture placement is about balance, flow, and function. Using this guide will instantly make your space feel more comfortable and intentional and if you’re second-guessing your layout, that’s where a designer’s eye can make all the difference. Sometimes the smallest shift in placement will change everything.